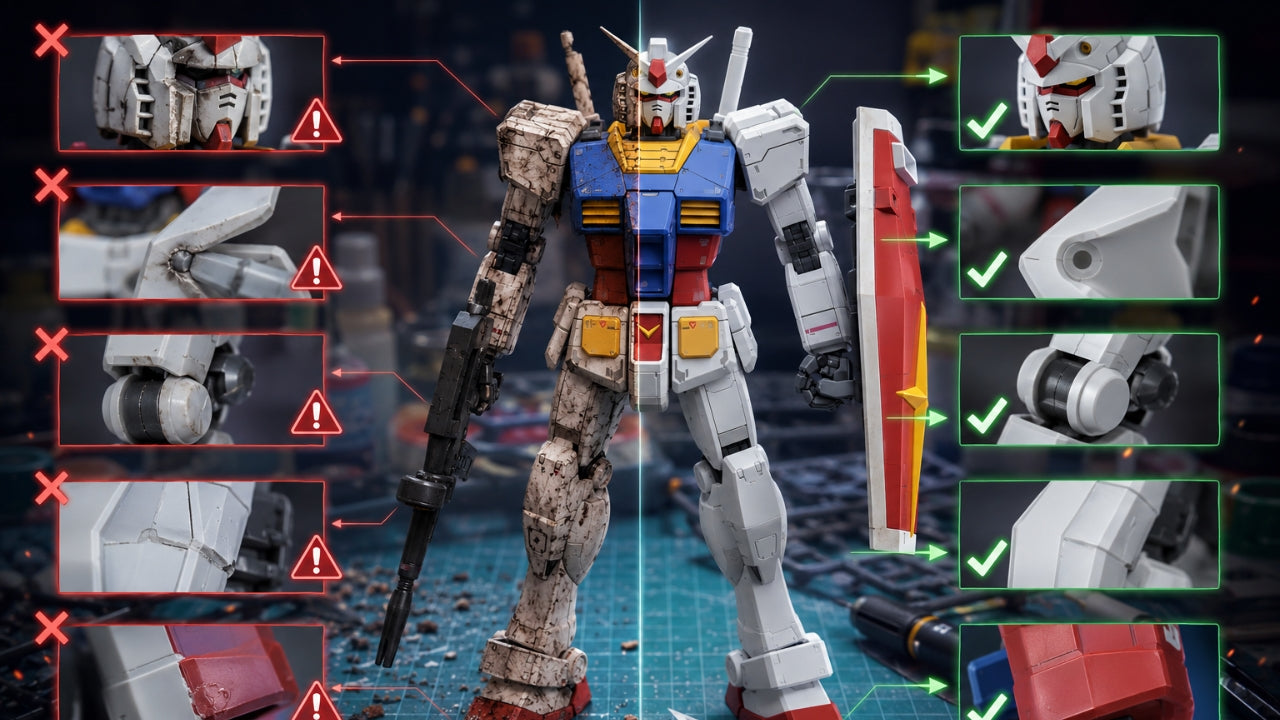
Top 10 Gunpla Building Mistakes and How to Fix Them
Stop Making These Gunpla Mistakes (We All Did Once)
Everyone makes mistakes when building Gundam model kits. Even experienced builders still encounter challenges. The difference between average and excellent Gunpla is usually not talent—it's knowing which mistakes to avoid and how to fix them when they happen. Here are the ten most common Gunpla building mistakes and the exact solutions that will improve your models immediately.
Mistake #1: Poor Nub Removal
This is the most visible mistake. Nubs are the plastic connection points where parts sprout from the sprue. Bad nub removal creates obvious white stress marks that ruin an otherwise clean model.
What goes wrong: Using only the nippers. Nippers leave a rough flat surface. Filing reduces the nub to nothing, but many builders stop there, leaving a visible depression or white stressed plastic edge.
How to fix it:
- Cut rough. Use nippers to cut the part off the sprue, leaving 2-3mm of plastic attached
- File primary. Use a 400-grit file to remove most of the nub, working perpendicular to the part
- Wet sand. Switch to 800-grit sandpaper with water to create a smooth, blended transition
- Polish final. Use 1000+ grit sandpaper or polishing cloth for a seamless finish
Pro tip: The multi-step process is essential. Jumping directly to fine grit sandpaper takes forever. The progression from coarse to fine produces the best results in minimum time.
Mistake #2: Forcing Parts Together
This creates stress fractures, broken connections, and permanently damaged pieces. Once a part breaks at a joint, it's either glued (reducing articulation) or wasted.
What causes it: Impatience. Trying to force a connection that doesn't quite line up. Or not understanding assembly order and putting parts together in the wrong sequence.
How to avoid/fix it:
- Read ahead. Look at the next 2-3 assembly steps before connecting anything. Understand how parts interconnect
- Dry fit first. Before final assembly, test fit all parts. They should fit smoothly without force
- Identify misalignment early. If something requires force, stop. Either you assembled something wrong, or you need to remove a bit of plastic to improve fit
- Use a hobby knife to shave tight spots. A tiny bit of plastic removal often makes the difference between rough fit and smooth fit
Red flag: If a part requires noticeable force to connect, something is wrong. Fix it before the plastic breaks.
Mistake #3: Wrong Plastic Cement
Using the wrong cement creates permanent damage or weak bonds.
The cement types:
- Polystyrene cement: For ABS plastic (most Gunpla). Bonds quickly, creates permanent joint
- ABS cement: Specifically for ABS plastic. Slower drying, more working time
- Super glue (cyanoacrylate): NOT for Gunpla. Creates brittle bonds, discolors plastic, difficult to remove
- Epoxy: Unnecessary for Gunpla. Overkill and difficult to position before hardening
How to fix it: Almost all Gunpla uses polystyrene (PS) plastic. Use polystyrene cement. Avoid super glue entirely. If you accidentally used super glue, the joint is permanently damaged—throw it out and start with a new part if possible.
Pro tip: Most Gunpla don't need cement at all. Only use cement for loose joints that need permanence, never for initial assembly. Fresh plastic-to-plastic fits should be tight enough without cement.
Mistake #4: Over-Applying Cement
Using too much cement creates ugly overflow, melts plastic, and ruins details.
What happens: Cement dissolves plastic on contact. Too much cement spreads beyond the joint, melting paint details, panel lines, and surface details. The result looks sloppy and unprofessional.
How to apply correctly:
- Apply a tiny amount to the male connection point (the part that inserts into another part)
- One small drop from the bottle is usually sufficient for an entire joint
- Work quickly before the plastic starts dissolving
- Wipe excess immediately with a dry cloth or paper towel
- Allow 10-15 minutes drying time before handling
If you applied too much: You can't undo cement damage once the plastic dissolves. Prevention is everything. Use less than you think you need.
Mistake #5: Lost or Missing Parts
Losing a small part mid-build is incredibly frustrating. Usually happens when building on a workbench without a proper container system.
How to prevent it:
- Build over a tray with raised edges. Any dropped part falls into the tray, not the floor
- Assemble in sequence. Only cut parts from the sprue as you need them. Don't cut everything at once
- Use a small container for discarded nubs and sprue pieces. Keeps your workspace organized
- Count parts as you cut them. Match the parts count in the instruction manual
- Bag extra pieces separately as you find them in the box. Some kits include duplicate runners you only use for specific color variants
If you already lost a part: Contact the manufacturer (usually Bandai) with your kit code. They often have replacement part programs. Alternatively, source replacement parts from online retailers specializing in spare Gunpla parts.
Mistake #6: Stress Marks on Plastic
Stress marks appear as fine white lines in the plastic, usually at joints where parts flex or articulate. They're caused by internal plastic stress from assembly or posing.
Causes:
- Forcing parts together too tightly
- Bending or flexing joints excessively during assembly
- Posing the model too aggressively after assembly
- Temperature changes causing plastic expansion/contraction
How to minimize them:
- Assemble joints smoothly without forcing
- Test articulation gently during assembly
- Don't pose models immediately after assembly—allow 24 hours for plastic to settle
- Avoid extreme pose angles that create maximum flex
- Store models in stable temperature environments
Can you fix existing stress marks? Minor ones fade over time. Severe ones are permanent. Once plastic stress-cracks, it can't be unseen. Prevention is the only real solution.
Mistake #7: Skipping Primer Before Painting
This is a beginner painting mistake that ruins finished models.
What happens: Bare plastic doesn't hold paint well. Paint adheres unevenly, creating blotchy coverage. Colors don't match manufacturer's recommendations. Paint eventually chips or flakes off.
The correct process:
- Clean the model. Wash with warm water and mild soap to remove dust and residue
- Apply primer. Gray or white primer creates a base layer that paint adheres to
- Paint topcoat. Paint adheres much better over primer
- Seal with topcoat. Gloss or matte topcoat protects the paint job
If you already painted without primer: The paint will likely chip. You can strip the model and start over, or accept the finish and seal it heavily with topcoat to minimize chipping.
Mistake #8: Incorrect Joint Assembly
This is more common than people realize. Some joints have specific assembly order or orientation that isn't immediately obvious from the instructions.
Examples:
- Ball joints assembled backwards (reducing articulation range)
- Connector pieces installed upside-down (creating binding)
- Frame parts assembled in wrong order (locking up the model)
- Joint rings installed backwards (creating loose instead of tight fit)
How to catch it: If articulation feels wrong or limited, disassemble that joint and check orientation. Compare to the instruction manual carefully. Sometimes multiple orientations fit, but only one is correct.
How to fix it: If you discover the error, carefully disassemble the joint and reassemble correctly. If the joint is glued, you may need to use plastic cement remover (like Mr. Hobby's Cement Remover) to soften the joint without damaging surrounding parts.
Mistake #9: Improper Panel Line Painting
Panel lines (the recessed details across the model) can be accentuated with paint to increase visual depth. But poor execution looks messy and cheap.
Common errors:
- Using paint that's too thick or wrong color
- Not cleaning excess paint from raised surfaces
- Applying panel line accent to unpainted plastic (looks wrong)
- Using markers that bleed into adjacent areas
Best practices:
- Use thin paint (not thick paint markers)
- Apply dark colors (black, dark gray, dark brown) along panel lines
- Use a thin brush or panel line ink
- Clean excess immediately with a slightly damp cloth before it dries
- Only panel line after the base paint is complete and dry
- For unpainted models, skip panel lining—it looks out of place
Mistake #10: Ignoring Build Instructions
This is the #1 cause of assembly problems. Builders skip ahead, ignore warnings, or build parts in the wrong order.
Why instructions matter:
- Assembly order affects whether joints work smoothly
- Some parts are meant to be painted before assembly
- Instructions show which parts are removable vs. permanent
- Warnings highlight fragile parts or easy mistakes
- Some advanced builds have multiple construction paths—instructions clarify which to use
Best practice: Read each step completely before assembling. Understand what you're about to build and why. This single habit eliminates most building mistakes.
Common Mistakes by Skill Level
Beginner Mistakes
- Poor nub removal
- Forcing parts together
- Skipping instruction steps
- Losing small parts
- Stress marks from over-manipulation
Intermediate Mistakes
- Over-applying cement
- Incorrect panel line application
- Wrong primer before painting
- Joint assembly errors
- Inconsistent sanding results
Advanced Mistakes
- Over-detailing (diminishing returns on effort)
- Mismatched paint colors across sessions
- Complex decal application errors
- Weathering that looks artificial
- Top-heavy custom builds falling over
Tools That Prevent Mistakes
Essential tools:
- Quality hobby nippers (prevents broken nubs)
- Hobby knife (allows precise fit adjustments)
- File and sandpaper progression (prevents visible nubs)
- Tray with raised edges (prevents lost parts)
- Good lighting (prevents assembly errors)
- Magnifying glass (catches small mistakes before they become big ones)
- Correct cement (prevents wrong adhesive damage)
Recovery Strategies
If you made a major mistake:
- Stop and assess. Can you fix it, or does it require starting over?
- Try disassembly first. Many mistakes can be reversed with patience
- Know when to accept imperfection. Some mistakes are visible only to you. A "flawed" finished model is better than a half-finished perfect one
- Document the lesson. Understanding why a mistake happened prevents repeating it
- Start over if necessary. Some mistakes (broken main frame, critical fitting issues) require starting fresh. It's not wasted effort—you learned the right way
Become a Better Builder
The path from beginner to advanced builder is paved with mistakes. Every experienced builder has made every mistake on this list. The difference isn't luck—it's learning from mistakes and developing proper habits. Focus on one technique at a time. Master nub removal before tackling painting. Master painting before attempting complex modifications.
Visit P-Rex Hobby for quality Gundam model kits and building supplies. As a Bandai Recommended Store, we carry the tools and kits you need to build amazing models. Our team can help you find the right kit for your current skill level and recommend tools to improve your results.
FAQ
Can I use super glue on Gunpla?
No. Super glue creates brittle bonds, discolors plastic, and is difficult to remove. Use polystyrene cement only.
Is it normal to make mistakes on your first model?
Absolutely. Everyone makes mistakes on their first build. This is how you learn. Your second model will be noticeably better.
Can stress marks be fixed?
Minor stress marks fade slightly over time. Major ones are permanent. Prevention is the only real solution.
What if I lost a part?
Contact the kit manufacturer first—they often have spare parts programs. Alternatively, online retailers sell spare Gunpla parts.
Can I undo cement?
Partially. Plastic cement remover can soften joints, allowing you to disassemble. But once plastic dissolves, it can't be reconstituted.
Should I paint every Gunpla?
No. Many Gunpla look great out of the box. Paint only if you want to improve detail, fix color separation, or customize the model.
What's the most common beginner mistake?
Poor nub removal. It's the most visible mistake and the easiest to fix with proper technique.

%0AEveryone%20makes%20mistakes%20when%20building%20Gundam%20model%20kits.%20Even%20experienced%20builders%20still%20encounter%20challenges.%20The%20difference%20between%20average%20and...)
Leave a comment
This site is protected by hCaptcha and the hCaptcha Privacy Policy and Terms of Service apply.