How to Apply Waterslide Decals on Gunpla Without Ruining Them
Waterslide decals can transform your Gunpla from basic to show-quality—but only if you apply them correctly. Many builders avoid them because they seem intimidating, but with the right tools and technique, waterslide decals are actually easier and more forgiving than sticker decals. This guide walks you through every step, from preparation to sealing, so you can confidently add professional details to your models.
What Are Waterslide Decals and Why Use Them?
Waterslide decals (also called water-transfer decals or settable decals) are printed designs on a water-soluble film backing. Unlike sticker decals that sit on top of your model's surface, waterslide decals dissolve into the paint, creating a seamless, smooth finish that looks like it was painted on. They're especially common on Ver.Ka and other high-end Gunpla kits.
The main advantages:
- They conform to curved surfaces and panel lines without creasing
- They don't create visible edges or lift at the corners
- They look more professional and display-quality
- They're more durable once properly sealed
Tools You'll Need Before Starting
Before you touch a single decal, gather these essential supplies:
- Waterslide decals (included in most Ver.Ka and Premium Grade kits)
- Hobby knife or X-Acto knife for cutting out individual decals
- Cutting mat (self-healing mat protects your work surface)
- Small bowl or cup of water (room temperature works best)
- Soft-bristle brush or tweezers for handling wet decals
- Decal setting solution (Micro Sol or similar product—this is crucial)
- Cotton swabs or makeup sponges for applying setting solution
- Paper towels or cotton cloth for drying
- Matte or gloss topcoat for sealing decals
- Airbrush or spray can for applying topcoat
- Toothpick or needle for removing air bubbles
Pro tip: Decal setting solution is non-negotiable. It softens the decal film, allowing it to settle into panel lines and curves. Without it, your decals will sit on top of the surface and look cheap.
Step-by-Step Application Guide
Step 1: Prepare Your Model Surface
The surface condition determines whether decals adhere properly. Before applying any waterslide decal:
- Make sure your paint is fully cured (at least 24 hours, ideally longer)
- Lightly sand the surface with 400+ grit sandpaper to improve adhesion
- Clean the area with a tack cloth to remove dust and paint particles
- Apply a gloss coat to the area where decals will go (even if the final finish is matte, gloss under decals helps them settle)
- Allow the gloss coat to dry completely before proceeding
This preparation step separates amateur results from professional finishes. Decals adhere best to smooth, clean, glossy surfaces.
Step 2: Cut Out Individual Decals Carefully
Use a sharp hobby knife to trim each decal from the printed sheet. Cut as close as possible to the printed design without cutting into the actual decal itself—this minimizes the visible film edges when applied.
- Make multiple light passes rather than one heavy cut
- Use a cutting mat to protect your work surface
- Keep the knife sharp (dull blades tear the film)
- Cut away from your body for safety
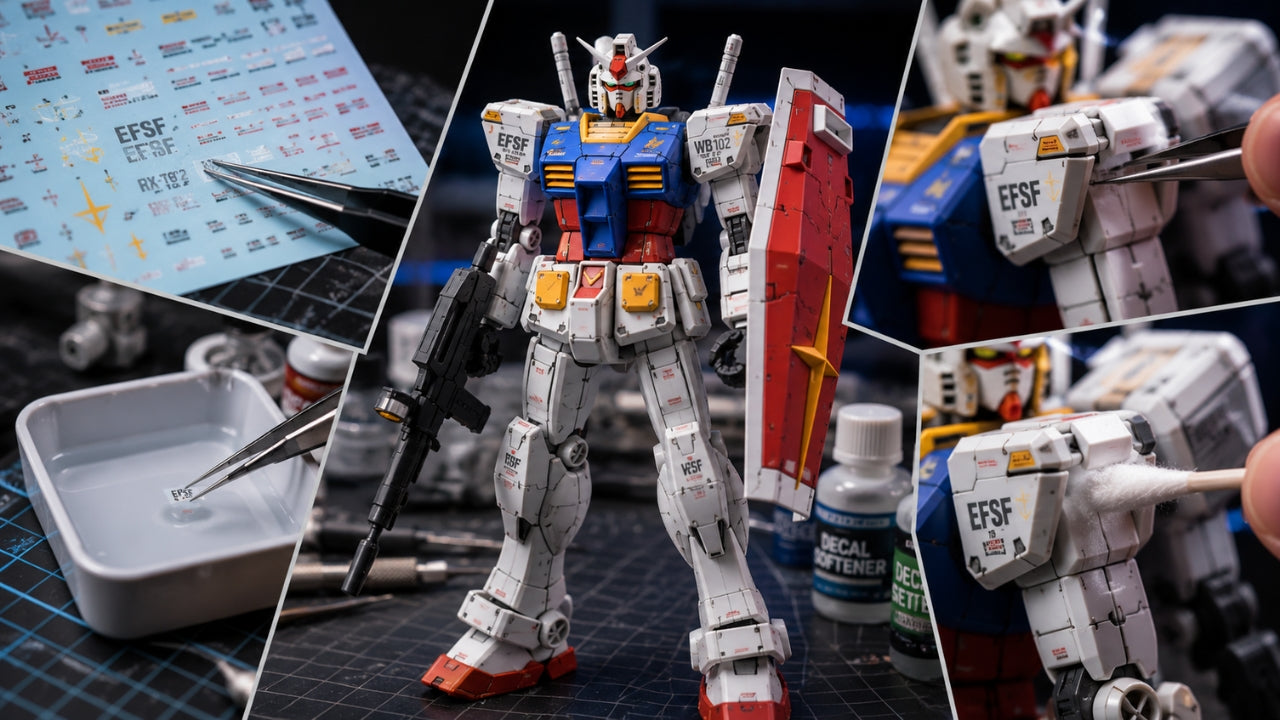
Step 3: Soak the Decal in Water
Fill a small bowl or cup with room-temperature water. Gently place the cut decal into the water, printed side facing up. After 30-60 seconds, the decal film will begin to separate from the backing.
- Use a toothpick or needle to gently nudge the decal film away from the paper backing
- It should slide freely after a few seconds
- If it's not sliding, soak for another 15-30 seconds
- Don't force it—forcing tears the decal
Step 4: Position the Wet Decal on Your Model
Using a soft brush or tweezers, carefully lift the decal film from the water. Position it on your model's surface where you want it placed. Wet decals are surprisingly forgiving at this stage—you can slide it around to adjust position before it fully adheres.
- Use the brush to gently position and smooth the decal
- Excess water will pool around the edges; use a paper towel to blot excess
- Don't press hard—light, gentle strokes are sufficient
- Once positioned, let it sit for 1-2 minutes to begin setting
Step 5: Apply Decal Setting Solution
This step is where waterslide decals become truly professional. Decal setting solution (like Micro Sol) chemically softens the decal film, allowing it to conform perfectly to panel lines and curves.
- Apply a small amount of setting solution around the decal with a cotton swab or soft brush
- Work from the center outward, gently pushing the decal into grooves and curves
- Apply more solution if the decal resists—it needs to be wet to work properly
- You should see the decal "shrink" slightly as it conforms to the surface
- Air bubbles will often disappear on their own; if they persist, carefully prick them with a toothpick and apply more setting solution
The setting solution may smell strong—this is normal. Ensure good ventilation while working.
Step 6: Let It Dry Completely
After applying setting solution, let the decal dry for at least 4-6 hours before handling. Longer is better—overnight is ideal. The decal film needs time to fully harden and bond with the paint.
Don't touch it, rotate the model, or apply a topcoat during this drying period. Patience here prevents cracking and shifting.
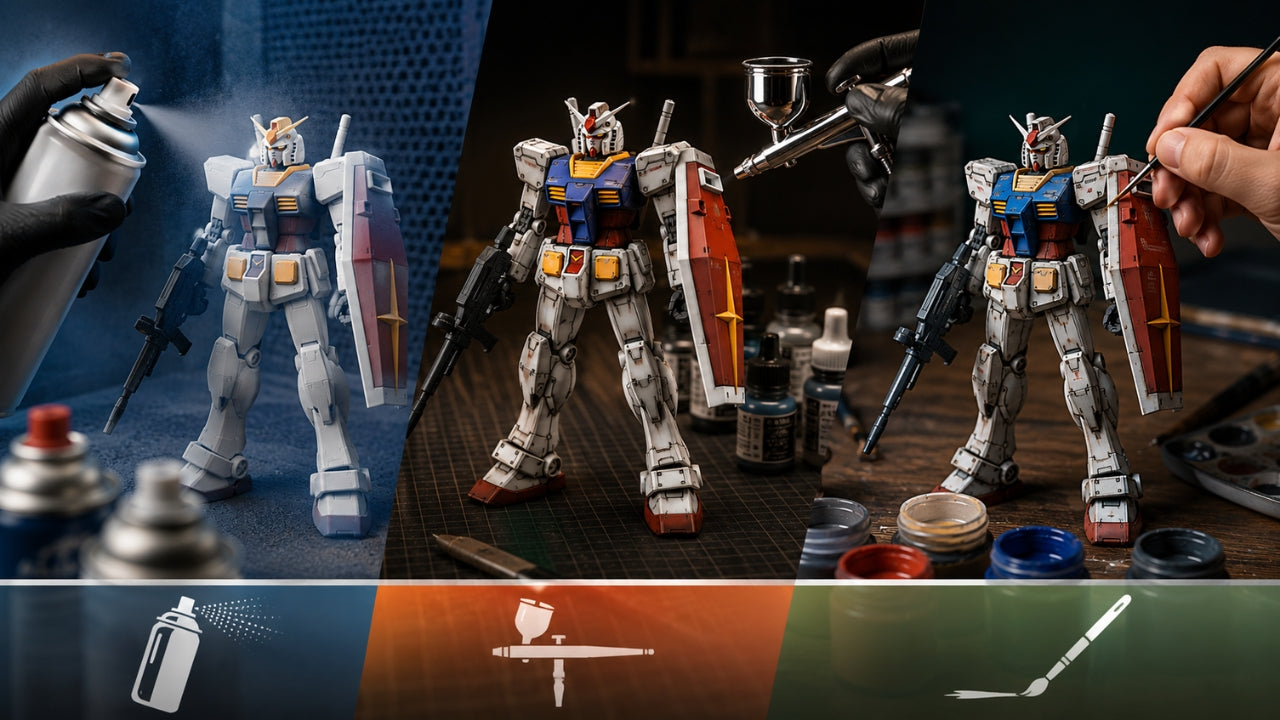
Step 7: Seal with Topcoat
Once fully dry, seal the decal with a matte or gloss topcoat, depending on your desired finish. The topcoat protects the decal from scratches, UV damage, and general wear. A gloss coat before application and matte coat after is a classic approach for authentic Gundam finishes.
- Spray lightly in thin, even coats
- Allow full drying between coats (follow your topcoat's instructions)
- Two coats of topcoat is standard for durability
Common Mistakes and How to Avoid Them
Mistake 1: Skipping the Gloss Coat Underbase
Decals need a slick surface to adhere smoothly. Applying decals directly to matte paint creates a textured surface that prevents proper settling. Always apply a gloss coat first, even if your final finish will be matte.
Mistake 2: Not Using Decal Setting Solution
Some builders assume setting solution is optional. It's not. Without it, your waterslide decals will look like sticker decals—flat, with visible edges, and prone to lifting. Setting solution is what makes waterslide decals worth using.
Mistake 3: Cutting Too Much Film Away
Trimming the decal backing is good, but cutting too close to the design leaves the decal edges visible. Leave a small margin of clear film around the printed area. Once setting solution shrinks the decal, this extra film becomes nearly invisible.
Mistake 4: Rushing the Drying Process
Wet decals are delicate. Handle them gently and allow adequate drying time between steps. Trying to apply topcoat before the decal fully hardens can cause cracking and separation.
Mistake 5: Using Hot or Tap Water
Hot water speeds up the soaking process but can damage the decal. Room-temperature water works best and gives you better control over the timing.
Pro Tips for Perfect Waterslide Decals
- Practice on spare parts first. Before applying decals to your main model, practice the technique on leftover frame pieces or extra armor parts. This builds confidence and skill.
- Work in batches. Soak all your decals at once, then apply them sequentially. This reduces overall drying time.
- Keep a damp brush nearby. A brush with a tiny bit of water on it helps reposition decals during the settling process.
- Use a light box. Backlighting helps you see air bubbles and imperfections before the decal fully dries.
- Apply setting solution liberally. You can't use too much—excess runs off but helps the decal conform better.
- Work in a dust-free environment. Dust and pet hair can stick to wet decals. A clean, enclosed workspace prevents this.
- Store unused decals properly. Keep leftover decal sheets in a sealed plastic bag with silica packets to prevent moisture absorption.
Perfect Your Display with Quality Gunpla
Once you've mastered waterslide decals, showcase your work with premium Gunpla kits that deserve detailed finishes. Ver.Ka and Premium Grade kits include extensive decal sheets designed to be applied with these techniques. Explore high-grade kits at P-Rex Hobby's collection to find models that match your skill level and interests.
Browse Gunpla Kits at P-Rex HobbyFAQ: Waterslide Decals
Q: Can I use waterslide decals on matte paint without a gloss undercoat?
A: Technically yes, but they won't settle properly. Always apply a gloss coat first for best results. You can apply matte topcoat over the finished decal.
Q: What if my decal tears while soaking?
A: If only a small corner tears, the decal is still usable—the damage will be hidden under topcoat. For larger tears, discard and use a spare if available, or practice on another part first.
Q: How long do waterslide decals last?
A: Properly applied and sealed waterslide decals last indefinitely. They're more durable than sticker decals because they're bonded to the paint layer.
Q: Can I remove a waterslide decal if I make a mistake?
A: Removing a fully cured waterslide decal is difficult without damaging paint. This is why careful positioning before the setting solution dries is critical. Once sealed, removal requires stripping and repainting.
Q: What's the difference between Micro Sol and Micro Set?
A: Micro Set is a preparation solution that helps adhesion. Micro Sol softens and shrinks the decal. Use both for best results: Micro Set on clean, glossy paint first, then apply the decal, then Micro Sol to settle it.
Q: Do I need special equipment like an airbrush?
A: An airbrush provides the smoothest finish, but spray cans work fine for topcoating decals. The key is light, even coats—this is more important than the application method.
Q: Why are my decals lifting at the edges after topcoating?
A: This usually means the decal wasn't fully dried before topcoating, or setting solution wasn't applied adequately. Ensure 6+ hours drying time and liberal setting solution application.

Leave a comment
This site is protected by hCaptcha and the hCaptcha Privacy Policy and Terms of Service apply.